Next Passion
Info on building of the next Passion

Initial fairing of our Didi 40 Cr. This is the section where the radius chine is four layers of 3 mm plywood and the temporary screws have created shallow hollows which show as the darker plywood in the photo.
All the temporary cleats are off the plywood cladding of our Didi 40 cr and I am progressing the filling of screw holes and fairing of the radius chine as fast as the weather allows.
Another deluge convinced me to purchase yet another tarpaulin to protect the hull and almost as soon as it was fitted another heavy shower came through. I used the time to router the edges of some of the stringers which will be exposed or inside lockers. I have a mental picture of testing the lockers for snags with a silk scarf.
With still more rain I trimmed off the ends of a few overlong screws and removed a few screw heads that were stopping the production of a neat routered and fibreglassed edge on the outside of the wet locker. There was still time to move to sanding the bulkheads in the quarter berth before the rain abated enough for some external work.
Outside I practiced using the hand plane, the belt sander and the orbital sander along with a long torture board. The belt sander does a particularly efficient job at fairing the transition from the flat 12 mm plywood to the two times 6 mm radius chine but it is too short to trust on the round parts without regular cross sanding with the torture board. I have now sanded enough to start filling the shallow hollows formed by the temporary screws which held the plywood together while the glue cured. The darker areas in the photo show these shallow hollows. The sections of the radius chine made up of two 6 mm layers have shallower depressions around the screw holes but they still need a wipe of filler.
I am now sealing all the screw holes with neat epoxy and once it is tacky laying on the filleting filler. This ensures the plywood is well protected and the filler sticks well to the tacky neat epoxy so it is quite a time effective method. I have done about half of the hull including filling the screw holes in the flat plywood panels and just need the rain to stay away for a little longer.
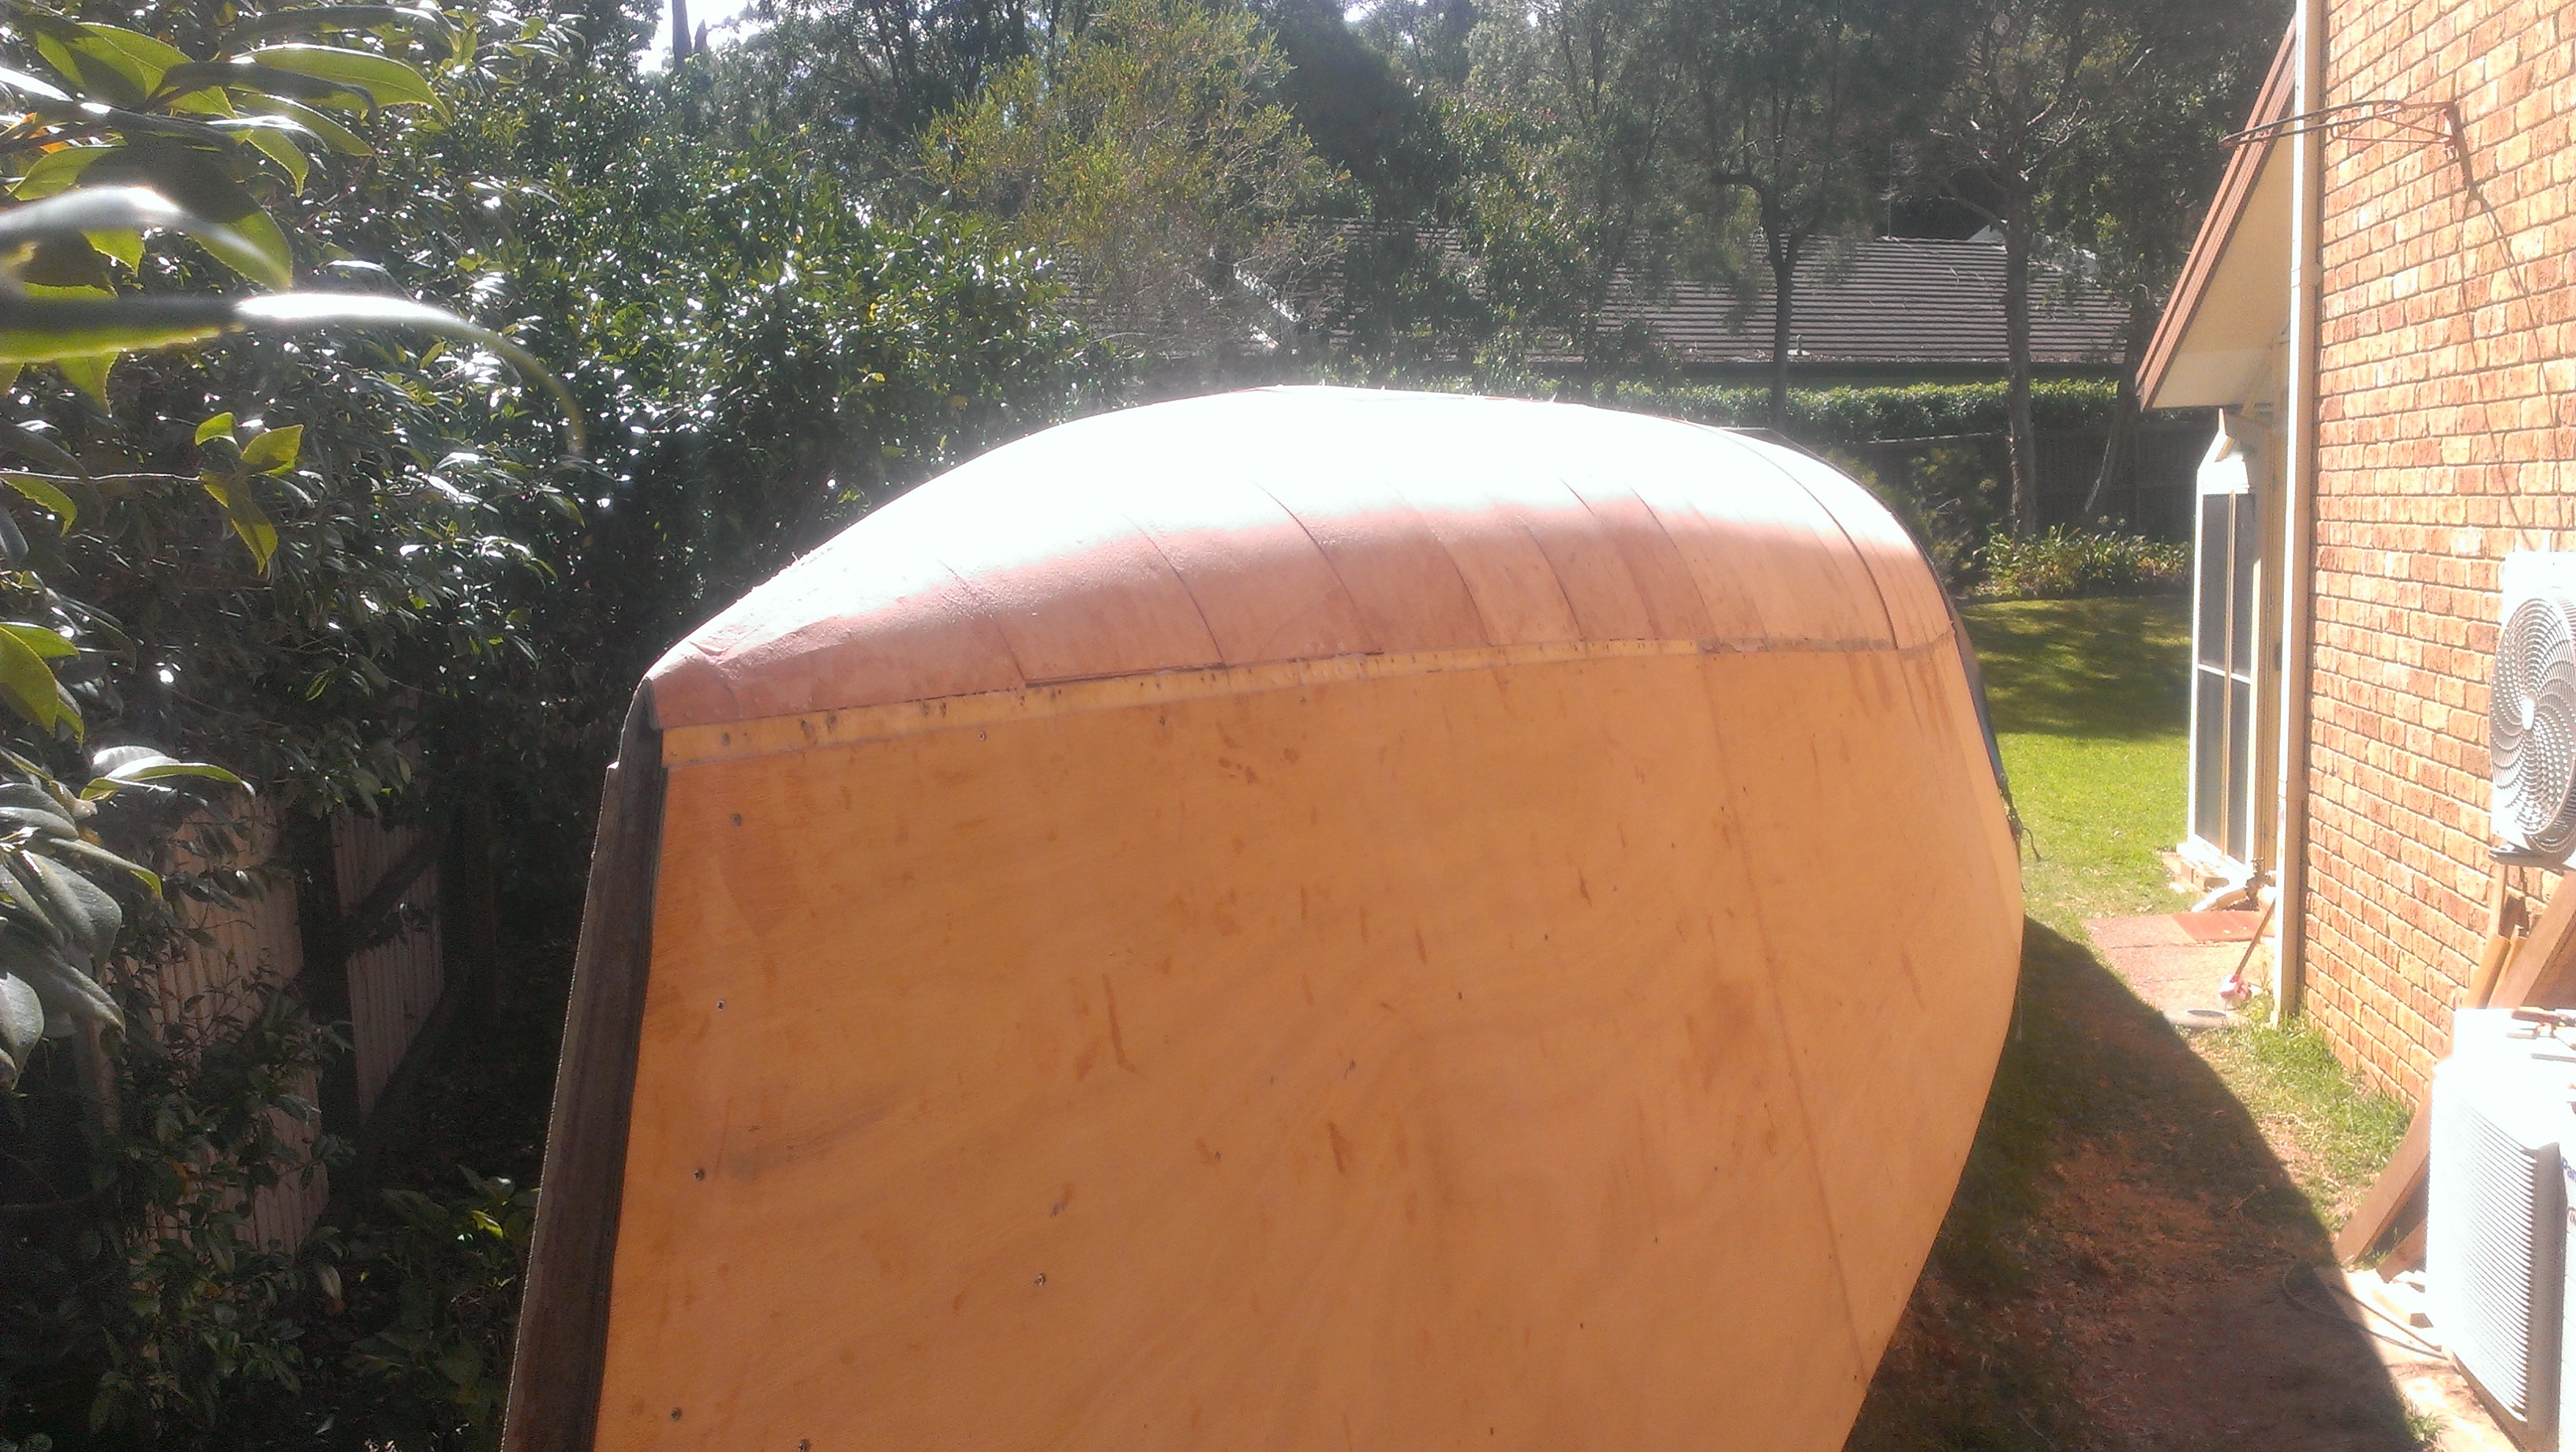
Today I placed the last two planks at the bow on the starboard side of our Did 40 Cr to complete the plywood skin of the hull. It has taken eight weeks to complete the skin from go to whoa which is a little longer than I anticipated at the beginning. A lot of time was taken fairing stringers for the first layer of the radius chine and a lot of time was taken tidying up the rebate on the 12 mm plywood where the second 6 mm layer of the radius chine lands. I did a little planing of the first 6 mm layer at the transitions to the 12 mm flat sections and a little torture boarding of the first 6 mm layer to ensure there were no hard spots that would show in the final layer. I think I have achieved the finish I was expecting at this stage. The shadow on the second layer indicates that the hull is quite fair and this can be compared with a similar photo in an earlier post of the first layeer.
As the planking has progressed the temperature under the overturned hull has become more moderate demonstrating the insulation properties of the timber.

The second 6 mm layer of plywood on our Didi 40 Cr is complete right to the bow. The photo shows temporary cleats holding the plywood hard against the radius chine.

The shadow on the second layer of plywood on the radius chine of our Didi 40 Cr shows that the hull is quite fair before sanding.
I am looking forward to placing the last plank on the second layer of the radius chine of our Didi 40 Cr. Three days of perfect working conditions should see the finish of this stage and then I can move on to planing the flat on the “V” of the keel. There are only seven more planks of 6 mm plywood before I move to a double layer of 3 mm plywood for the tight radius at the approach to the bow. The 3 mm layers are easy to bend for all but the last plank and I will try to do them together as I did on the first layer.
Yesterday started out warm and sunny so I could clean up the glue from the first layer on the port side ready for the second layer. While the tarpaulins were off I took this photo of the starboard side which is still to be prepared.
The starboard side of our Didi 40 Cr still to be prepared for the second 6 mm layer of plywood on the radius chine at the bow.
By the time the preparation was completed the wind and rain came after gluing just one plank. As rain threatened all afternoon I went under the hull and started preparing the inside of the water tank for the epoxy glass join of the top of the water tank to the newly formed radius chine hull. That is ready to do now the first time I need an inside job. I have a mental list of lots of inside jobs still to do like fitting the last two shelves in the quarter berth and fitting for later installation the fronts to these shelves. There are still 20 mm triangle cleats to be fitted to the front edge of these shelves and to the ones in the saloon and if these jobs run out I can do some of the filleting of the hull to the frames on the near vertical edges where gravity is not much of a factor. The rudder stock and associated bearings and stainless steel is in manufacture so that should arrive in good time to be fitted and then completing the rudder will be another good inside job.
There is 152 planks to be shaped and glued into place to form the round bilge on our Didi 40 Cr. After reality sank in I set a target of eight planks a day thinking that I might better it on a good day. Well by that measure there are few good days. As hard as I try one plank an hour seems to be my production rate. On the first layer a lot of time was spent fairing stringers progressively so I thought the second layer might go a bit quicker. That has not proven to be the case because there is still a lot of preparation work. I have to tidy up the 6 mm rebate where the top layer of plywood overlaps the join with the 12 mm plywood and do some fairing of the first layer.
After some experimentation I have settled for 18 mm 8 gauge metal threads to hold the two layers together while the glue cures. Smaller screws provided enough holding pressure but the larger screws have a larger diameter head which gives more driving power with the battery operated driver and it is easier to clear any glue from the slotted head.
Today I worked ten hours on the hull and managed ten planks for the regulation one per hour but it is hard to find days where the conditions are right for one to work such hours. It cannot be too hot or be wet and I must have all the materials needed and make no mistakes.
With a large part of the hull now planked with the two layers of 6 mm plywood I have tried my hand at fairing the radius chine with the torture board. What tiny bit I have done looks good but there are a lot of screws to remove and a lot of hull that will need the treatment.

Progress on the second 6 mm plywood layer on the radius chine of our Didi 40 Cr
In the photo you can see how much of the second layer is completed. Since I took this photo on Saturday afternoon I have added another 16 planks and at a rough guess the radius chine section is 70% complete.
Well that was a slow week for boat building. A very hot Monday restricted work hours to the late afternoon and and with rain threatening all Friday I have completed just 24 of the 76 planks on the second layer. I completed the interior glassing of butt joins in the side panels today and tried my hand at filleting the ply skins to the transom. Between the epoxy fillets and the few shelves still to be installed inside I figure there is plenty of work ahead for many rainy days.
There is little difference in the appearance of the hull with the second layer so I have not bothered with photos. Also I have kept the covers on all but the work area each day in case of rain. In lieu of a photo I will show a drawing of what she might look like on the water. I am still thinking about the name and Passion X is one possibility. The sketch shows the bow sprit, longer spinnaker pole and cabin top traveller. Also the shape of the stern is modified ever so slightly.
Off site work has started on my rudder stock so in a few weeks I will be able to fit the rudder bearings.

This is how I propose to finish our Didi 40 Cr. Note the removable bow sprit, the long spinnaker pole and the cabin top traveller.
Today with more help from friends we passed the half way mark on skinning the radius chine on the Didi 40 Cr. Now all the stringers are hidden under the first layer of 6 mm ply. Already I have fitted four planks of the second layer to check my construction detail and now I can go full steam ahead.

First layer of the radius chine completed on our Didi 40 Cr
On the first few planks where we used two 3 mm layers of ply to achieve the 6 mm we have temporary cleats between the stringers. Forward of that the stringers are close enough to not require additional cleats.
With help from the crew we have almost finished the first 6 mm layer on the radius chine of our Didi 40 Cr. I was able to use 6 mm plywood up to 2.4 metres from the waterline entry at the bow. Beyond that the sheets would snap when bent to the required radius. Dudley calls for 4 mm ply from there but I opted to do the first layer in two layers of 3 mm plywood. A single sheet of 3 mm ply was enough to cover the last 2.4 metres in two layers so it is both a practical and economic option. In the penultimate 1.2 metres we used cleats between the stringers to make sure the 3 mm layers were pulled together but for the last 1.2 metres the stringer spacing was so close as to not need any additional cleats.
The other minor variation was for the last 2 metres to take the two 3 mm layers across the tangent stringer to the keel centre line. This makes it easier to hold down the end of the plywood and also gives avoids a join across the tangent stringer doubler.
At this stage I stopped using the 12 mm ply cleats to hold down the plywood planks to the tangent doubler and started using 19 mm silicon bronze nails which have amazing holding power in the tough dense meranti keel timber. Right at the bow a lot of nails were needed to hold the last plank to the tight curve.

Tomorrow I will true up the centre line with the rebate plane and try to complete the starboard side. After that it will leave just 72 planks to go (counting the 2 by 3mm planks as a single 6 mm plank)
I am going to use the 2 by 3mm planks an extra metre further back from the bow on the second layer so that the external skin is not so highly stressed. We have found it almost a quick to do the two 3 mm layers together as to do a single 6 mm layer and with the solid 6 mm layer as a backing a few silicon bronze staples should hold down the 3 mm plywood between the stringers without the need of extra ply cleats.
Using the 12 mm plywood cleats held down with three 10 gauge 32 mm self tappers has proved to be a great success. Once I started to use a large screwdriver to torque up the self tappers to the maximum the joins have been finished flush and square to the tangent line with remarkable consistency and accuracy. The hull side of the cleat is covered with packaging tape which acts as a mould release so the glue joins look like fine furniture.

On our Didi 40 Cr the glue joins after removing the ply clamping cleats are of high quality.
In the early morning rain I went about preparing some inside jobs including rearranging a support so that I could complete the shelving in the quarter berth. When the rain stopped I moved outside and did a final fairing of the stringers up past the mast step ready for planking. Two of the crew from Passion arrived through the morning and by midday we were well into the first layer of 6 mm plywood on the radius chine.

Passion crew helping build the Didi 40 Cr on a sunny Sydney afternoon
With the jobs shared out between marking, cutting, planing and drilling work progressed at a pace and to a high standard. Two extra pairs of eyes were good at spotting places where an extra cleat was need to hold the ply down and by 5 pm we had nine planks fitted and glued. We are now well forward of the 800 mm radius at the mid saloon station and are moving up to the front berth and still managing to bend the 6 mm sheets into position. Two extra pairs of hands helped and it will be interesting to see how I manage alone on the other side of the hull.
The photo at the end of the day shown the extent of planking on the starboard side and also shows four planks of the second layer at the stern of our Didi 40 Cr.

About a third of the way through planking the radius chine of the Didi 40 Cr
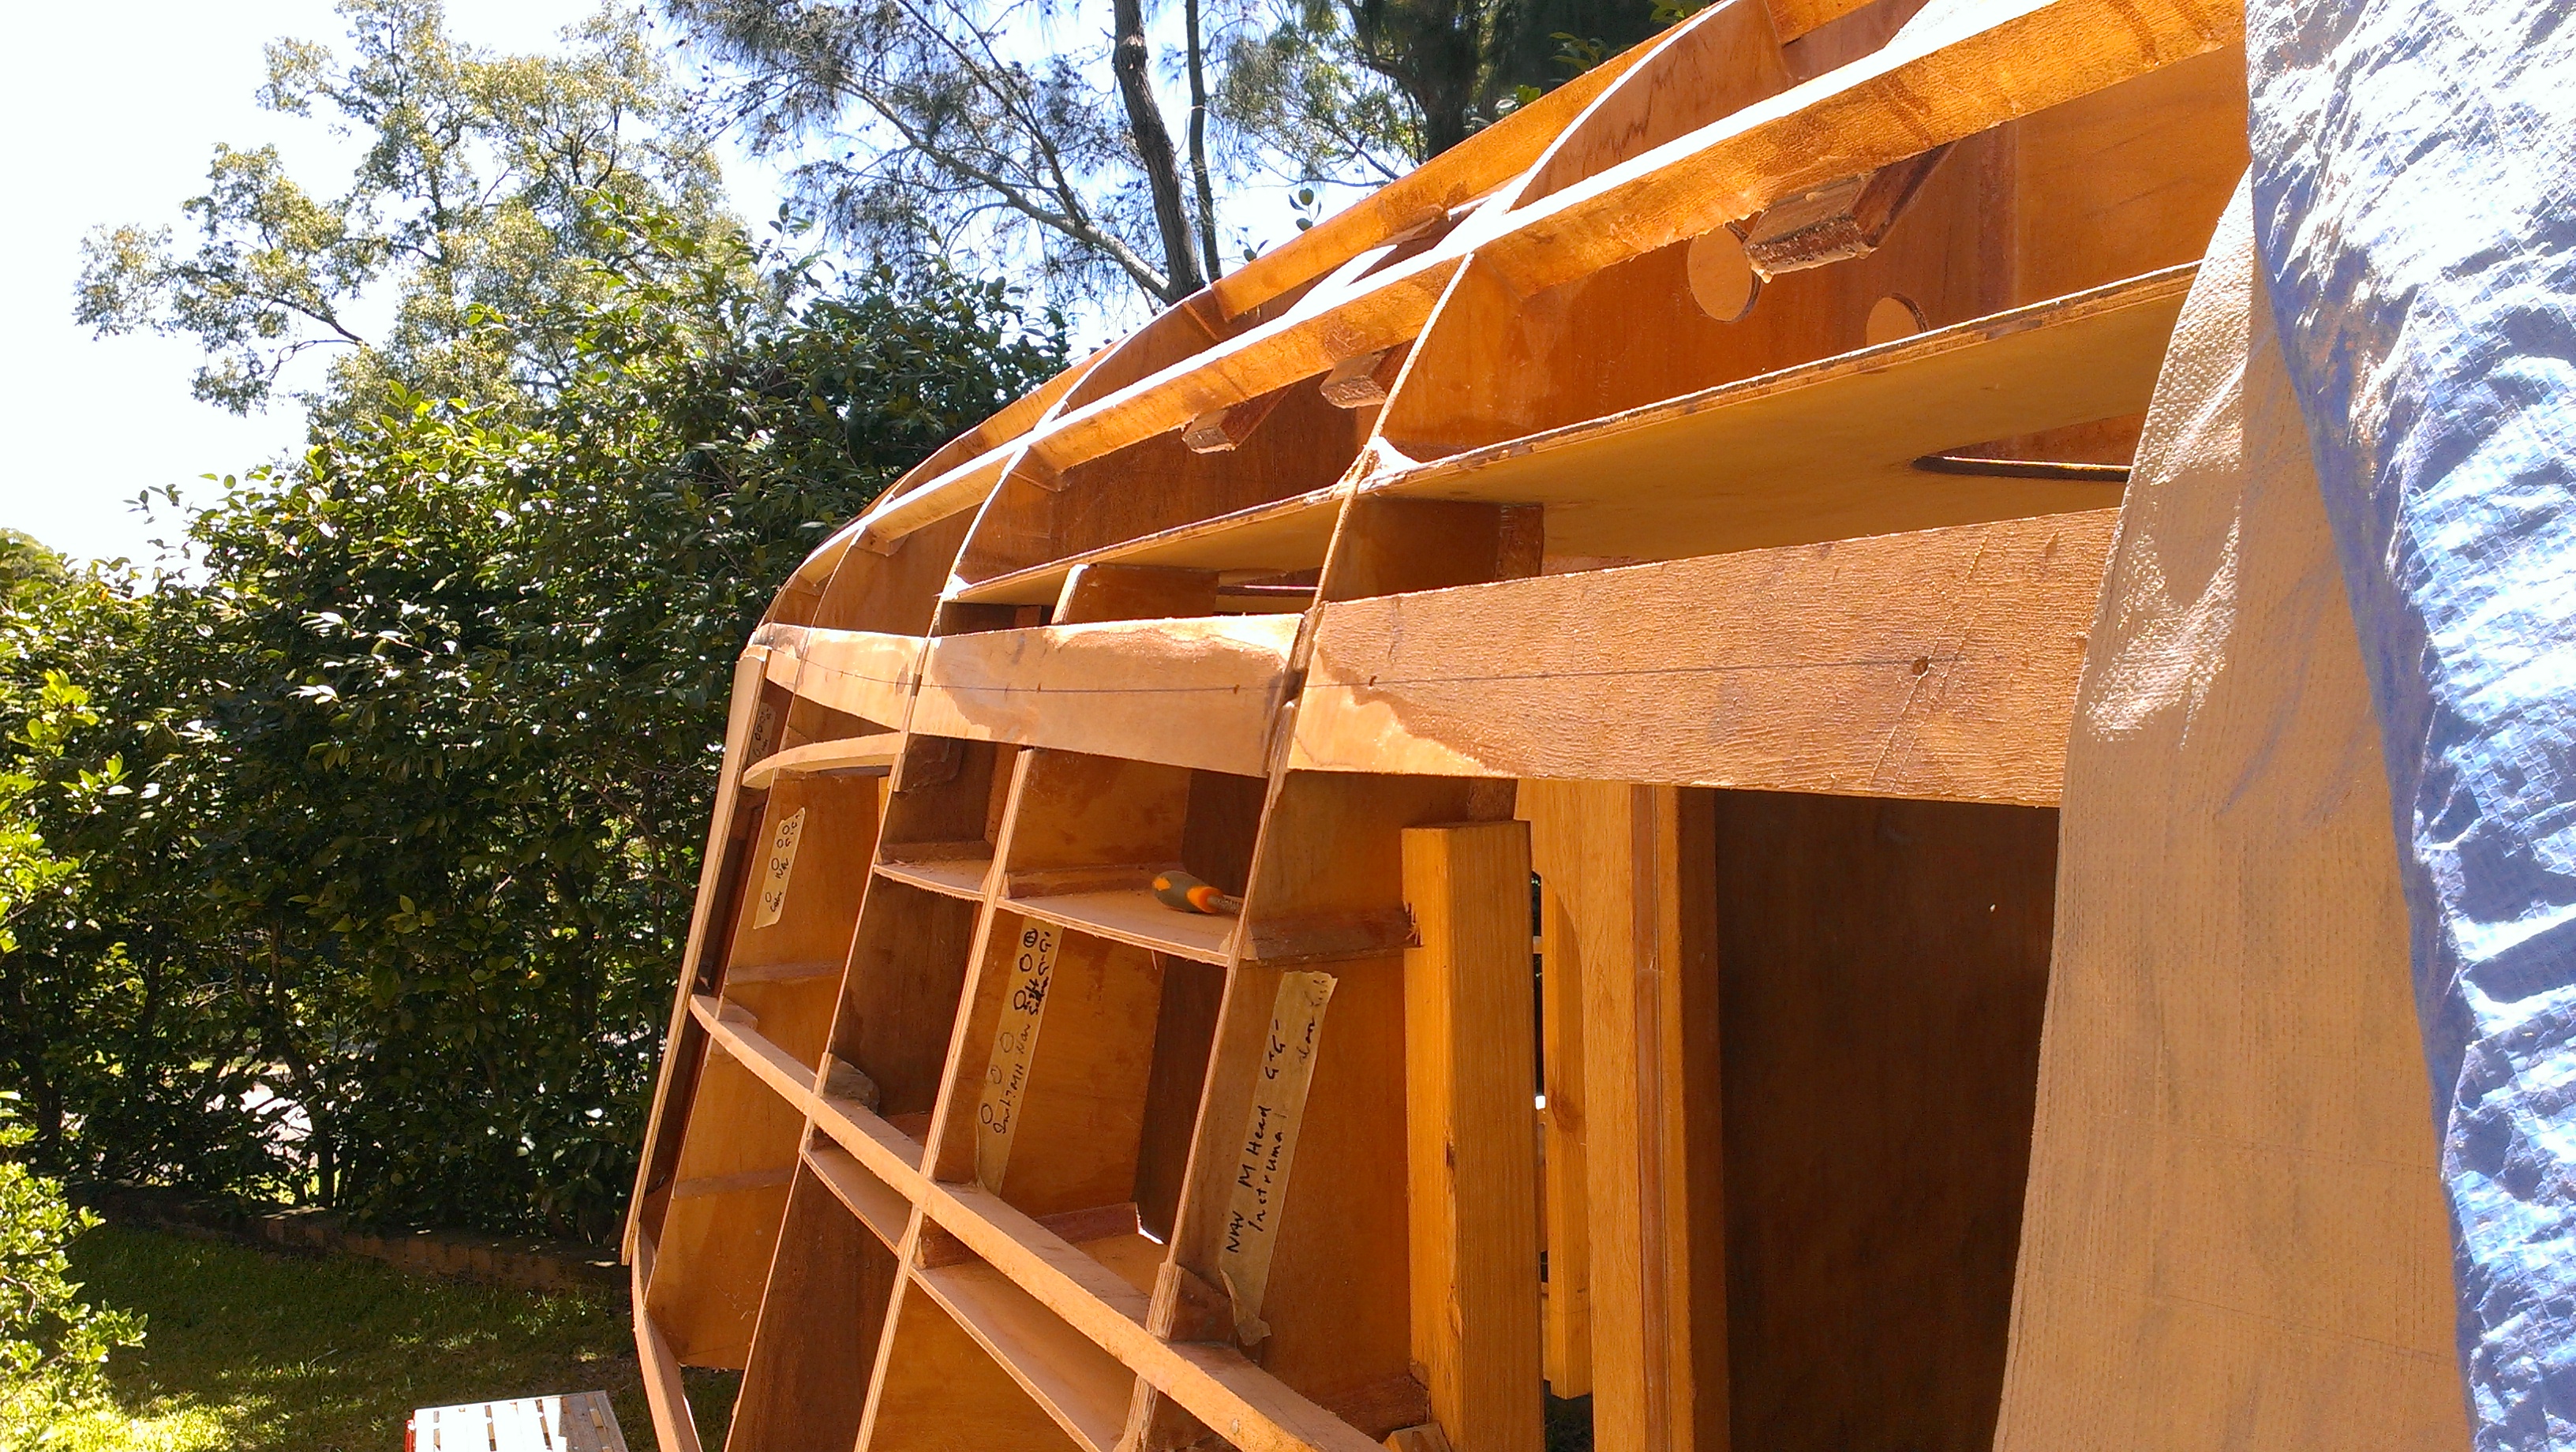
Today was a bits and pieces day. The early drizzle prevented me applying the last coat of potable water tank lining so I ventured under the hull to complete the glassing in of the chainplate frames. Both sides are now glassed in with four layers of 425 gram double bias on both sided of the frames. The structure is looking strong and when the 6 mm plywood saloon back rest is epoxied into the shelves it will form a very stiff box structure. Just as the glassing was completed the rain stopped so I was able to complete the tank lining. When I say complete I mean what can be done before the hull is turned upright and the tank sides glassed to the hull skin. Because of the wet paint I could not proceed with more of the first 6 mm plywood layer so I started a trial of the second layer of 6 mm plywood at the rear of the hull. The angle grinder was used to clear us excess epoxy from the rebate. The rebate plane was used to fair the section and the join between the rebate and the first 6 mm plywood layer. Next the plane was used to take off a small high spot and finally a torture board used for some light final fairing. The photo shows the surface before the second layer is added and if the second layer finished as fair as the first I will be very happy.

Faired and lightly torture boarded first layer of the radius chine on the Didi 40 Cr
In the afternoon I was able to install the first four 280 mm wide planks at 20 degrees to the first layer. Because of the 20 degree angle each planks cover a 300 mm length of the hull so I can reuse my plywood clamps from the first layer to secure the ends of the second layer. I did not get my target 8 planks a day completed but the other tasks made if a full days work.
Each post I usually include the name of the yacht design the Didi 40 Cr and I include that in the photos. I do this so that Google and other search engines can locate the posts and images.
The clamping arrangement for the first layer of 6 mm plywood on the radius chine of the Didi 40 Cr has worked well. With the help of a crew member we made up lots of clamps from 280 mm long by 50 mm wide pieces from 12 mm ply. These were predrilled to be a loose fit on a 10 gauge self tapper so that when the self tappers were screwed into the hull the clamp would come down on the 6 mm ply. When fitting the radius chine 300 mm wide strips of 6 mm ply the top clamp was loosely fitted to form a wedge into which the 6 mm ply would fit while the tapers were planed on the strips as required to follow the hull shape. Once the tapering was completed the 300 mm wide plank was glued into position and the clamp on the lower chine pressed hard against the hull while the self tappers were driven home. The self tappers are in line with the stringers and go through the 6 mm rebated of the 12 mm ply flat sections plus the 12 mm of the ply doubler and so far non have pulled out of this 18 mm thick ply section. Once the lower join was completed I then tightened the three self tappers in the upper clamp and then clean up any excess glue before moving to the next plank.
The photo shows a clamp removed and the good tight join left behind. The back side of the clamps are covered in packaging tape which is an excellent mould release material and I have shown the removed clamp next to the join.

First layer of the 6mm radius chine with the clamp removed showing the tight join and the packaging tape on the back side of the removed clamp
The first layer is progressing towards the saloon area and I have had to slow down the planking to complete the potable water tank lining before covering the water tank area. I have now moved around the fattest most curved section of the hull The shadow of the hull on the sides shows that it is very fair even before any sanding prior to the second layer.

The shadow on the hull shows that the radius chine is a series of flats and the high edges will be lightly sanded prior to the second layer.
Today is Ash Wednesday which for Catholics in Australia is a day of fast and abstinence.
Well it was not so fast for us on the race track nor for fellow competitor Farrst Company who ripped a genoa during the race. What was fast was the incoming tide and a new Dufor yacht, Van Demon, that joined the fleet for the first night.
It was an unusual race with a fresh sea breeze that gusted and shifted only to die in the closing minutes of the race while the fleet struggled through Humbug. We set the most sail area we could anticipating a run for the first leg but the breeze was so strong that the fleet sailed at hull speed for the first leg.
Our normal leeward side approach to Cockatoo Island did not pay off as a fresh gust reached the windward yachts first carrying them around the island ahead. In an uncharacteristic following mode down the side to Cockatoo we struggled to find a gap but did manage at the rounding to find a spot to leeward of Gwhizz who appeared to be reefing the main. Further out from the Cockatoo Island wind shadow Agrovation sailed into the breeze first and held that gap all the way around the course.
On the work against the tide up the Hunters Hill shore Van Demon picked a great lift off the eastern end of Cockatoo and got a big jump on the fleet. Meanwhile Izzi was up in the leading bunch tantalizingly within reach if only we had a favourable wind shift.  Tonight was not the night for the dice to roll our way. We could not bear away behind the stern of the black fleet Young 40 and so had to put in a short tack just as we were catching Agrovation. We just missed turning marks by a boat length and has to tack on three occasions but the biggest knock was reserved for the finish line where we were knocked and fell half a boat width too low only to be knocked on the tack almost back where we came from.
A strong incoming tide carried us towards the line ahead of the following fleet that was not reaching towards the line. Tartan approached the finish line at 90 degrees to the angle we had and so any semblance of a good performance by Passion was blown out of the water.
Back on dry land the boat building progress on Next Passion was also not going fast. My ambition of 16 planks a day has been halved and that is for a full 8 hour day. Final fairing of the radius chine section is taking longer than expected but the time spend is paying dividends with the curved sections matching as well as could be expected.

10% of the radius chine of the Didi 40 Cr is shaped and glued in place
I was keen to start the moulded ply section of the hull because I was concerned that my 6mm plywood might be too stiff for the task. Dudley recommends 3 ply while mine is 5 ply hardwood and quite a bit stiffer. After a bit of experimentation I settled for clamping the 6 mm ply to the doublers using 12 mm ply clamps secured with large self tappers. The hull side of the 12 mm ply clamps is covered with packaging tape so that it will not stick to the hull.

The first section of radius chine temporarily fixed to my Didi 40 Cr
I also made up a very precise 788 mm radius template to check all the doubler angles and stringer contact points. Because the stern where I started the radius chine ply has a very flat run great care is needed to keep the run straight.

788mm radius template being used to check the doubler angles and stringer contact on my Didi 40 Cr
The neighbour watched the progress all through the day at as evening fell he gave it a nod of approval.

First plywood panels fitted to my Didi 40 cr and showing keel bolt template
Final fairing of the keel before fastening the plywood took longer than expected so I managed only two ply panels on the bottom today. As well as the final fairing I set up the keel bolt templates on the inside and outside of the keel, checked that they were positioned correctly and opened up the pilot holes. This task was on my job list to be completed before the plywood is secured over the keel area. It is taking longer to trim the keel than I expected so I think it will take another three days to complete the bottom panels.
The new build is now covered with 12 mm plywood from stem to stern and from gunwhale to the radius chine. I have been very pleased with the progress and on Tuesday last I fitted four sheets in a long working day that finished in moonlight.
Moonlighting on my Didi 40 cr
Today the fairing of half of the bottom was completed ready for the first ply sheets. Dudley says not to fair the keel to far ahead of fitting the plywood if you are working outside so I am sticking to his recommendations. A really sharp had saw is ideal for establishing the level across the keel and stringers

The keel and full width keel frame blocking have been faired ready for the bottom sheets.
I am also doing the two sides together. Once the first side is cut and trimmed to the radius chine line I use it as a template for the second side and so far that has worked well.
Some of the off cuts from the side panels will be large enough for the smaller bottom panels so there will be fewer full sheets to carry back and forth from the hull to the workshop.

Off cuts from the side panels will be ideal for the narrower bottom panels
As a bonus item Dudley has a new post on his blog with a really good photo of the prototype Black Cat.

Photo of the interior of Black Cat the prototype of the Didi 40 Cr that I am building
You can read the article here
http://dudleydix.blogspot.com.au/2015/02/what-saints-did-next.html
The original article with more photos can be read here
http://whatthesaintsdidnext.com/2015/01/30/black-cat-champion-race-yacht/comment-page-1/#comment-81
You will need to scroll up from the comments to the top of the article to see the photos.
Remarkable the rain stayed away for the Wednesday twilight race and for the post race post mortems and barbecue. As we came dead last I performed an autopsy on Passion and can report that the death in the race was due not only to getting becalmed on the corner of Goat Island but also due to a healthy weed garden growing under the wing keel. I have never seen so much weed and barnacles on Passion but I do admit that it is 18 months since the last antifouling.
Thursday was a brilliant morning to be woken up by the waves from the 6am ferry. After a breakfast of rice bubbles and a cup of earl grey it was time to take Passion to Noakes for the scheduled post mortem examination. The lift was waiting early so I motored straight into the slings and was off in a few moment ready for the inspection.
I predict Passion will be back with a vengeance for the Autumn series.
Back home the skies were clear so I removed the tarps from Next Passion and started the ply cladding. The 2.4 by 1.2 metre sheets of ply are not the easiest to handle so Elaine assisted with the transfer from the garage to the building site and before long I had a sheet cut to size, the edge routered for the join to the curved section and all the fastening holes pre drilled. By marking all the stringer locations on the back side of the ply sheet I get a guide for applying the glue and a guide for drilling the fasteners. There are about 40 fasteners per sheet so a methodical approach is well worth the effort.
The final fairing of the stringers took longer than expected but on the other hand the tolerances are very fine and the glue joins quite thin.
It is probably just as well that I ran out of screws as fitting the second sheet would have added a couple of hours to what had already been a busy day.
Today I procured enough fasteners for fixing another five sheets, fitted the second sheet to the bow opposite the first and fixed a second sheet to the starboard side. The second sheet for the port side was cut using the starboard one as a template and it is ready to go when I am.
The second sheet ties in with the chainplate support and the two shelves on either side so there is quite a bit of fairing to be done to ensure nothing distorts the ply sheets. There will be less as I move to the stern and there might be a chance to improve on the two sheet a day production schedule. There are 20 sheets to go before I move to the moulded ply radius chine section.
The photo you are waiting for is here

The first two sheets of plywood installed on the starboard side.
The join in the ply has to line up with the centre line of the stringers so that has to be marked on the face of the ply doublers.