Next Passion
Info on building of the next Passion
At last I am happy with the fairing of the gunwales and have moved on to glassing the deck. I am about a third of the way through and need at least three fine days to finish the deck. In the photo you can see where the layers of glass join and overlap. I am using two layers of a light glass cloth hoping to get a smoother finish than we did on the hull where I used a heavy double bias cloth. The glass cloth was first purchased about 25 years ago when I was building vacuum bagged foam fibreglass NA14’s. I am going to run out before the job is finished so do I buy just enough or get another roll for 25 years supply? On the wet days I have finished the first sanding of the ceiling, epoxy coated the laminated roof beams in the cabin and started sanding the epoxy ready for the first coat of paint on the ceiling. The crew helped fit the Vetus exhaust hose and that took very little time as it went to plan and followed all the planned curves. We also progressed the bits and pieces of timber needed to complete the transom sugar scoop stern. About 24 individually shaped timber pieces are needed and each has to be glued in place in order. It is like having a kit delivered ready to go on the first suitable occasion.

One third of the way through glassing the deck of our Didi 40 Cr
Sanding and filling holes in the deck ready for glassing is painfully slow. The orbital sander with the vacuum cleaner attached has sped up the flat surface sanding but I still had all the holes to fill and all the gunwales to fair by hand. Friend Kevin gave the sander and vacuum cleaner a work out on the deck on Thursday while I fitted the four layers of 3 mm ply doubler under the deck at the stem. Friday was a mixed bag including finishing off the last 125 mm of capping on the gunwales, sanding some of the ceiling in the cabin and fitting hinges to the V bunk tops in the evening. Most of Saturday was spent filling screw holes out in the cold wind. Each hole was primed with neat epoxy to fill the exposed wood and while the epoxy was still tacky filled with a thickened epoxy mix. Today I warmed up planing and torture boarding the gunwales. On Thursday we had taken a cut down the edges of the gunwales with the power planer and today I used a medium length plane to round off the edge and finished up with a very fine setting on a 50 year old hand plane. I have had this plane since I was a teenager and used it to trim the edges of 1/16 inch Queensland cedar veneer we used to use for building cold moulded Moth Class yachts. it is one of my favourite wood working tools as it is simple and very light so you can wield it all day.
The final task was to torture board the edges with a metre long board and 60 grit paper which was pretty good exercise on a cold day.
I now need some fine weather now for the deck glassing.

Friend Kevin helping with the sanding. Photo taken from a ladder in the neighbour’s yard.

My favourite little hand plane had a four hour workout today

Elaine approving the hand planing job. The glue lines in the plywood are a useful planing guide

Now that the capping pieces on the gunwhale of our Didi 40 Cr are planed and sanded in line with the deck and hull the sweet shape of the yacht is clear.

Once I started sanding the deck I could not stop till the front half was finished. I needed to add the rope as a hand hold to stop me sliding off the sanded deck.

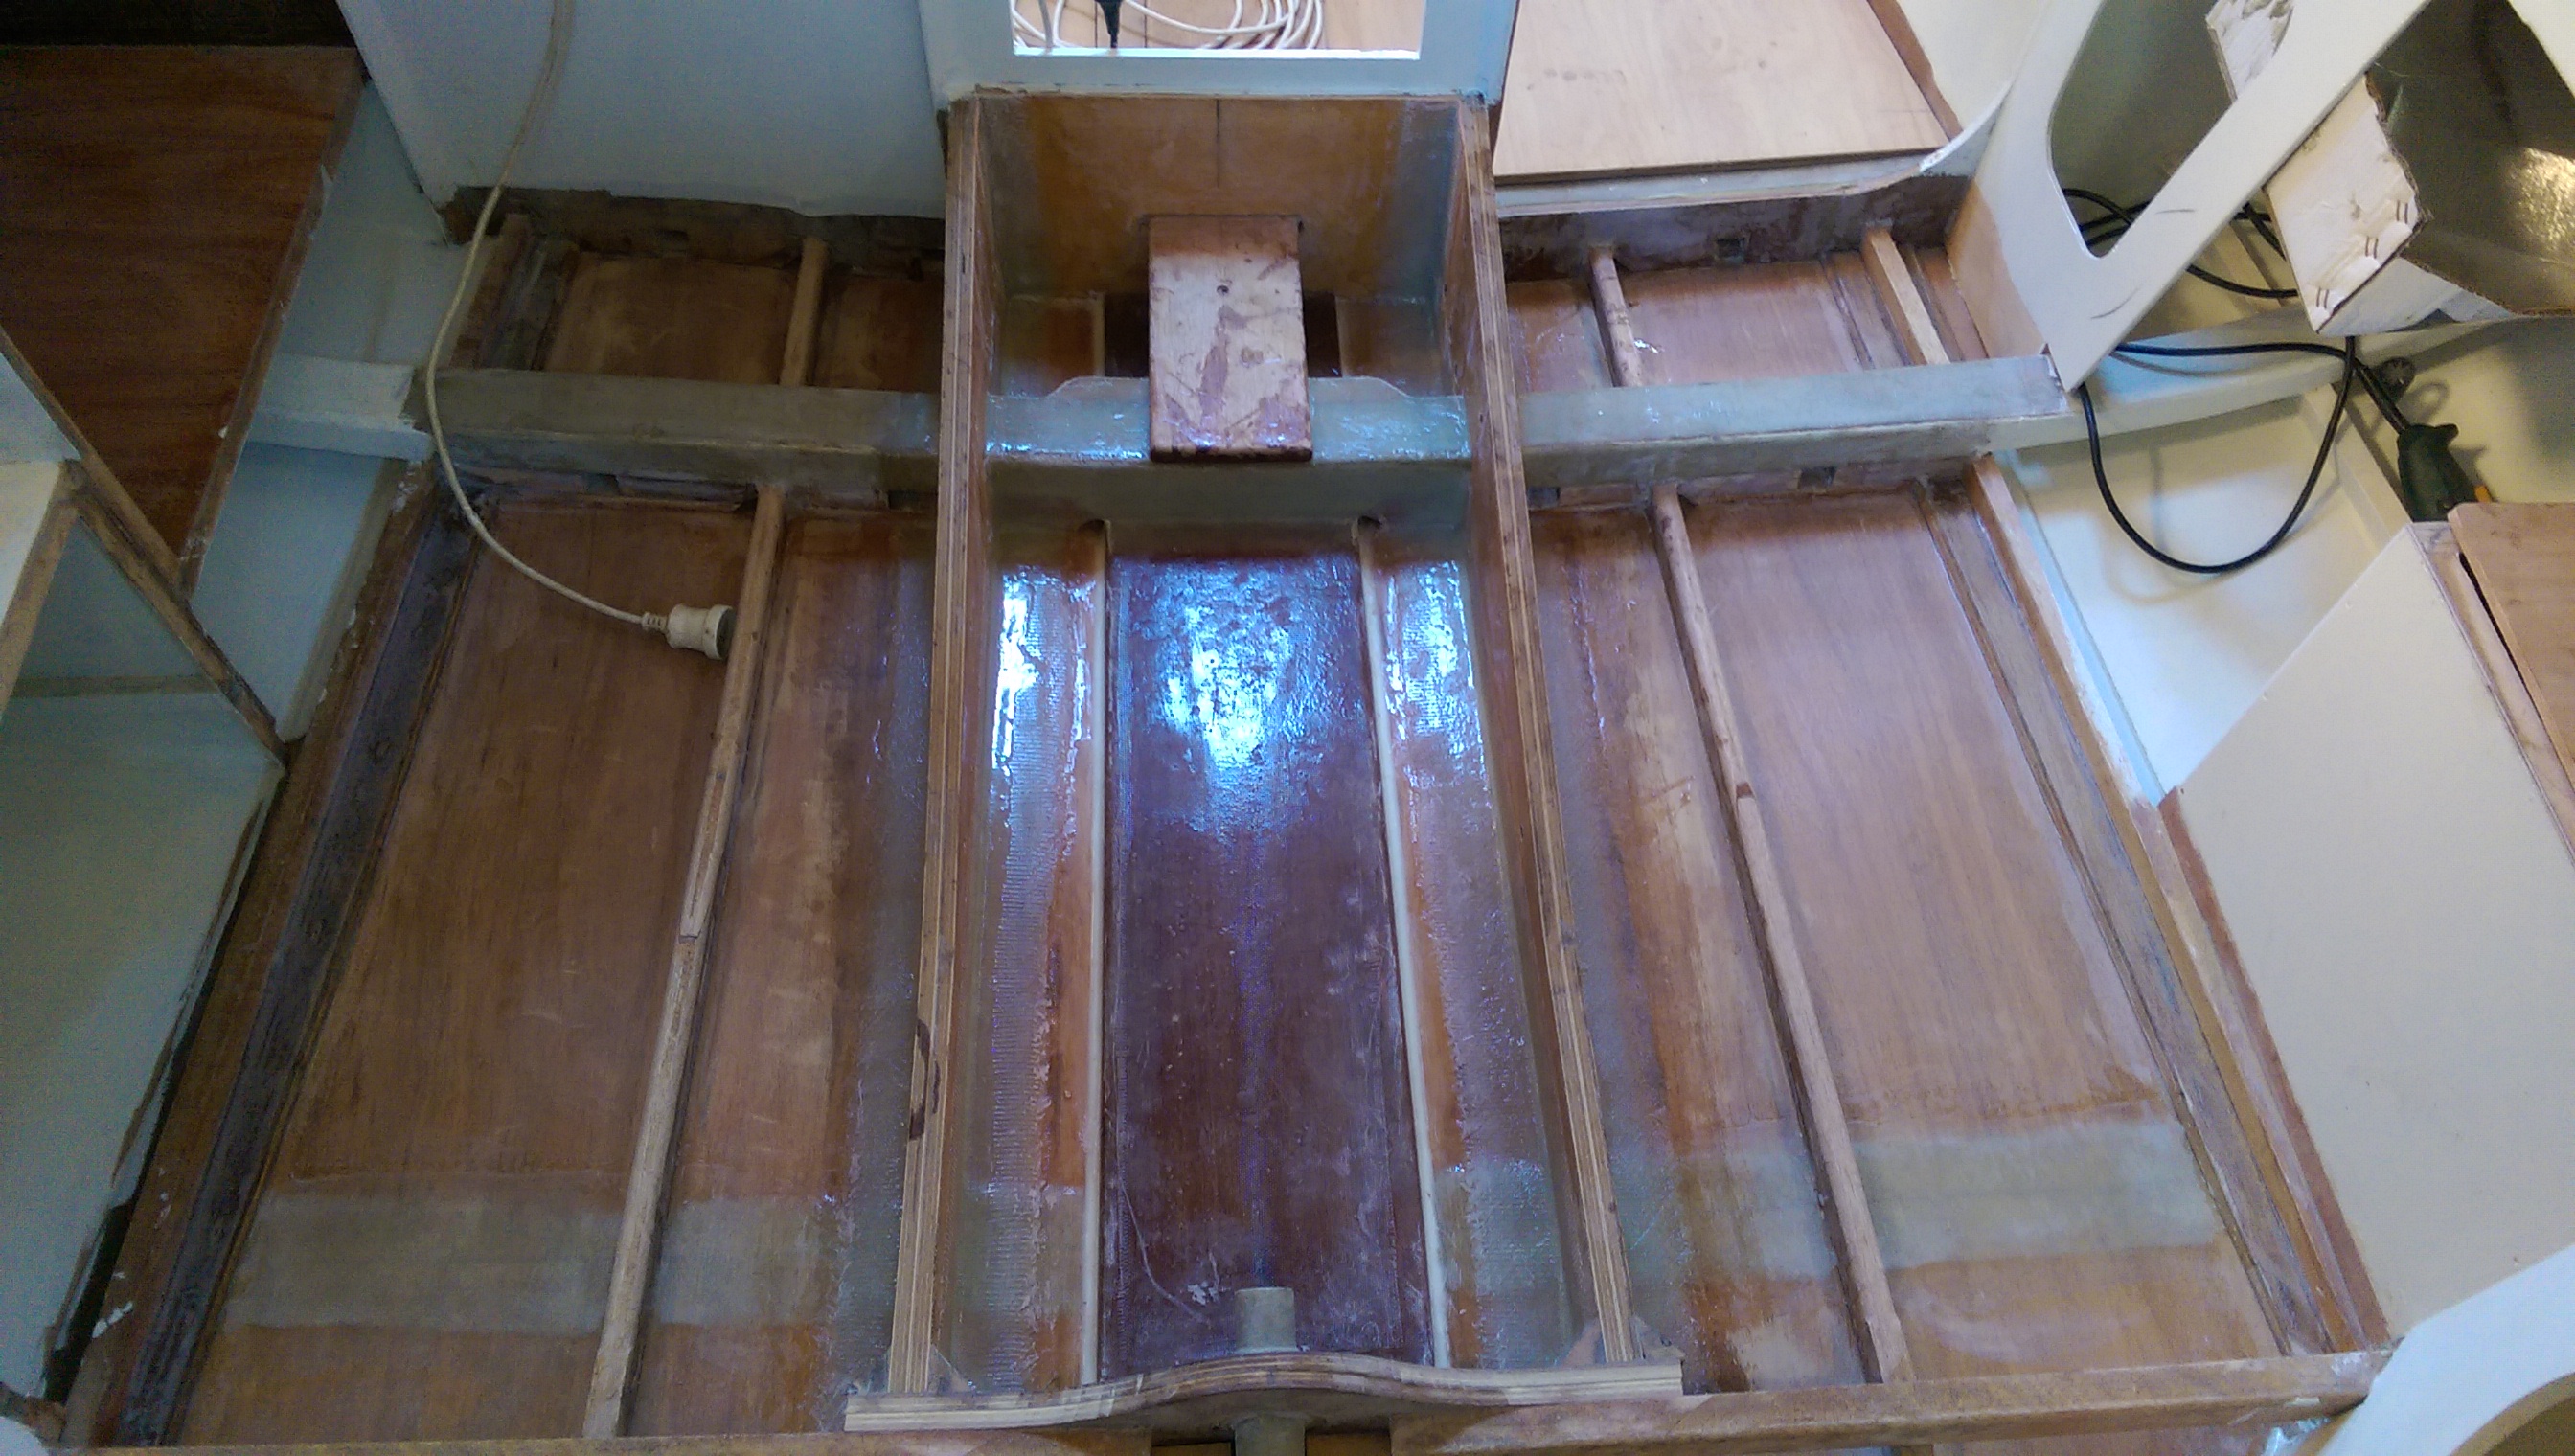
24 mm plywood mast knee. The deck in this area is reinforced with two layers of 6 mm ply so the total is four layers of 6 mm ply from side to side. The hand hold will be practical as well as lightening the appearance of the knee.

The little infill panel at the front of the V berth shaped so that the bunk tops do not hit the frames when the tops are folded back. Lots of storage under the bunks.
There are so many interesting jobs to do on the boat that I feel spoilt for choices. I know there is a critical path which will get the boat finished in the shortest time but I think it is my boat and if I want to do this particular job now I can. So a few little jobs have been finished and some large ones done. The capping on the gunwhale is glued in place and planed and sanded down to the line of the deck and hull. The two edges will be faired with the torture board before final rounding and glassing. A couple of the small jobs I wanted to do were the knee at the mast step in which in incorporated a hand hold and the front of the V berth bunks where a small in fill piece was needed so that the bunk lids would not foul the frames when lifted. One job that I have been putting off is the sanding of the ceiling as the overhead sanding is dusty. I solved that problem by connecting the vacuum cleaner to the sander and not only is it almost dust free but the suction pulls the sander down to the surface making the job quite easy. I got quite excited with this development and sanded half of the deck, some of the hull and some of the cabin sides in an afternoon. The sanding was possible despite the strong winds as the vacuum took all the dust away.
Other interesting jobs awaiting are fitting the control cables to the engine and fitting the water lock muffler and exhaust pipe but if the weather is fine I must push on with the deck glassing and painting so that we can start putting fittings on the deck while I finish the coamings on the cockpit. So many interesting choices.

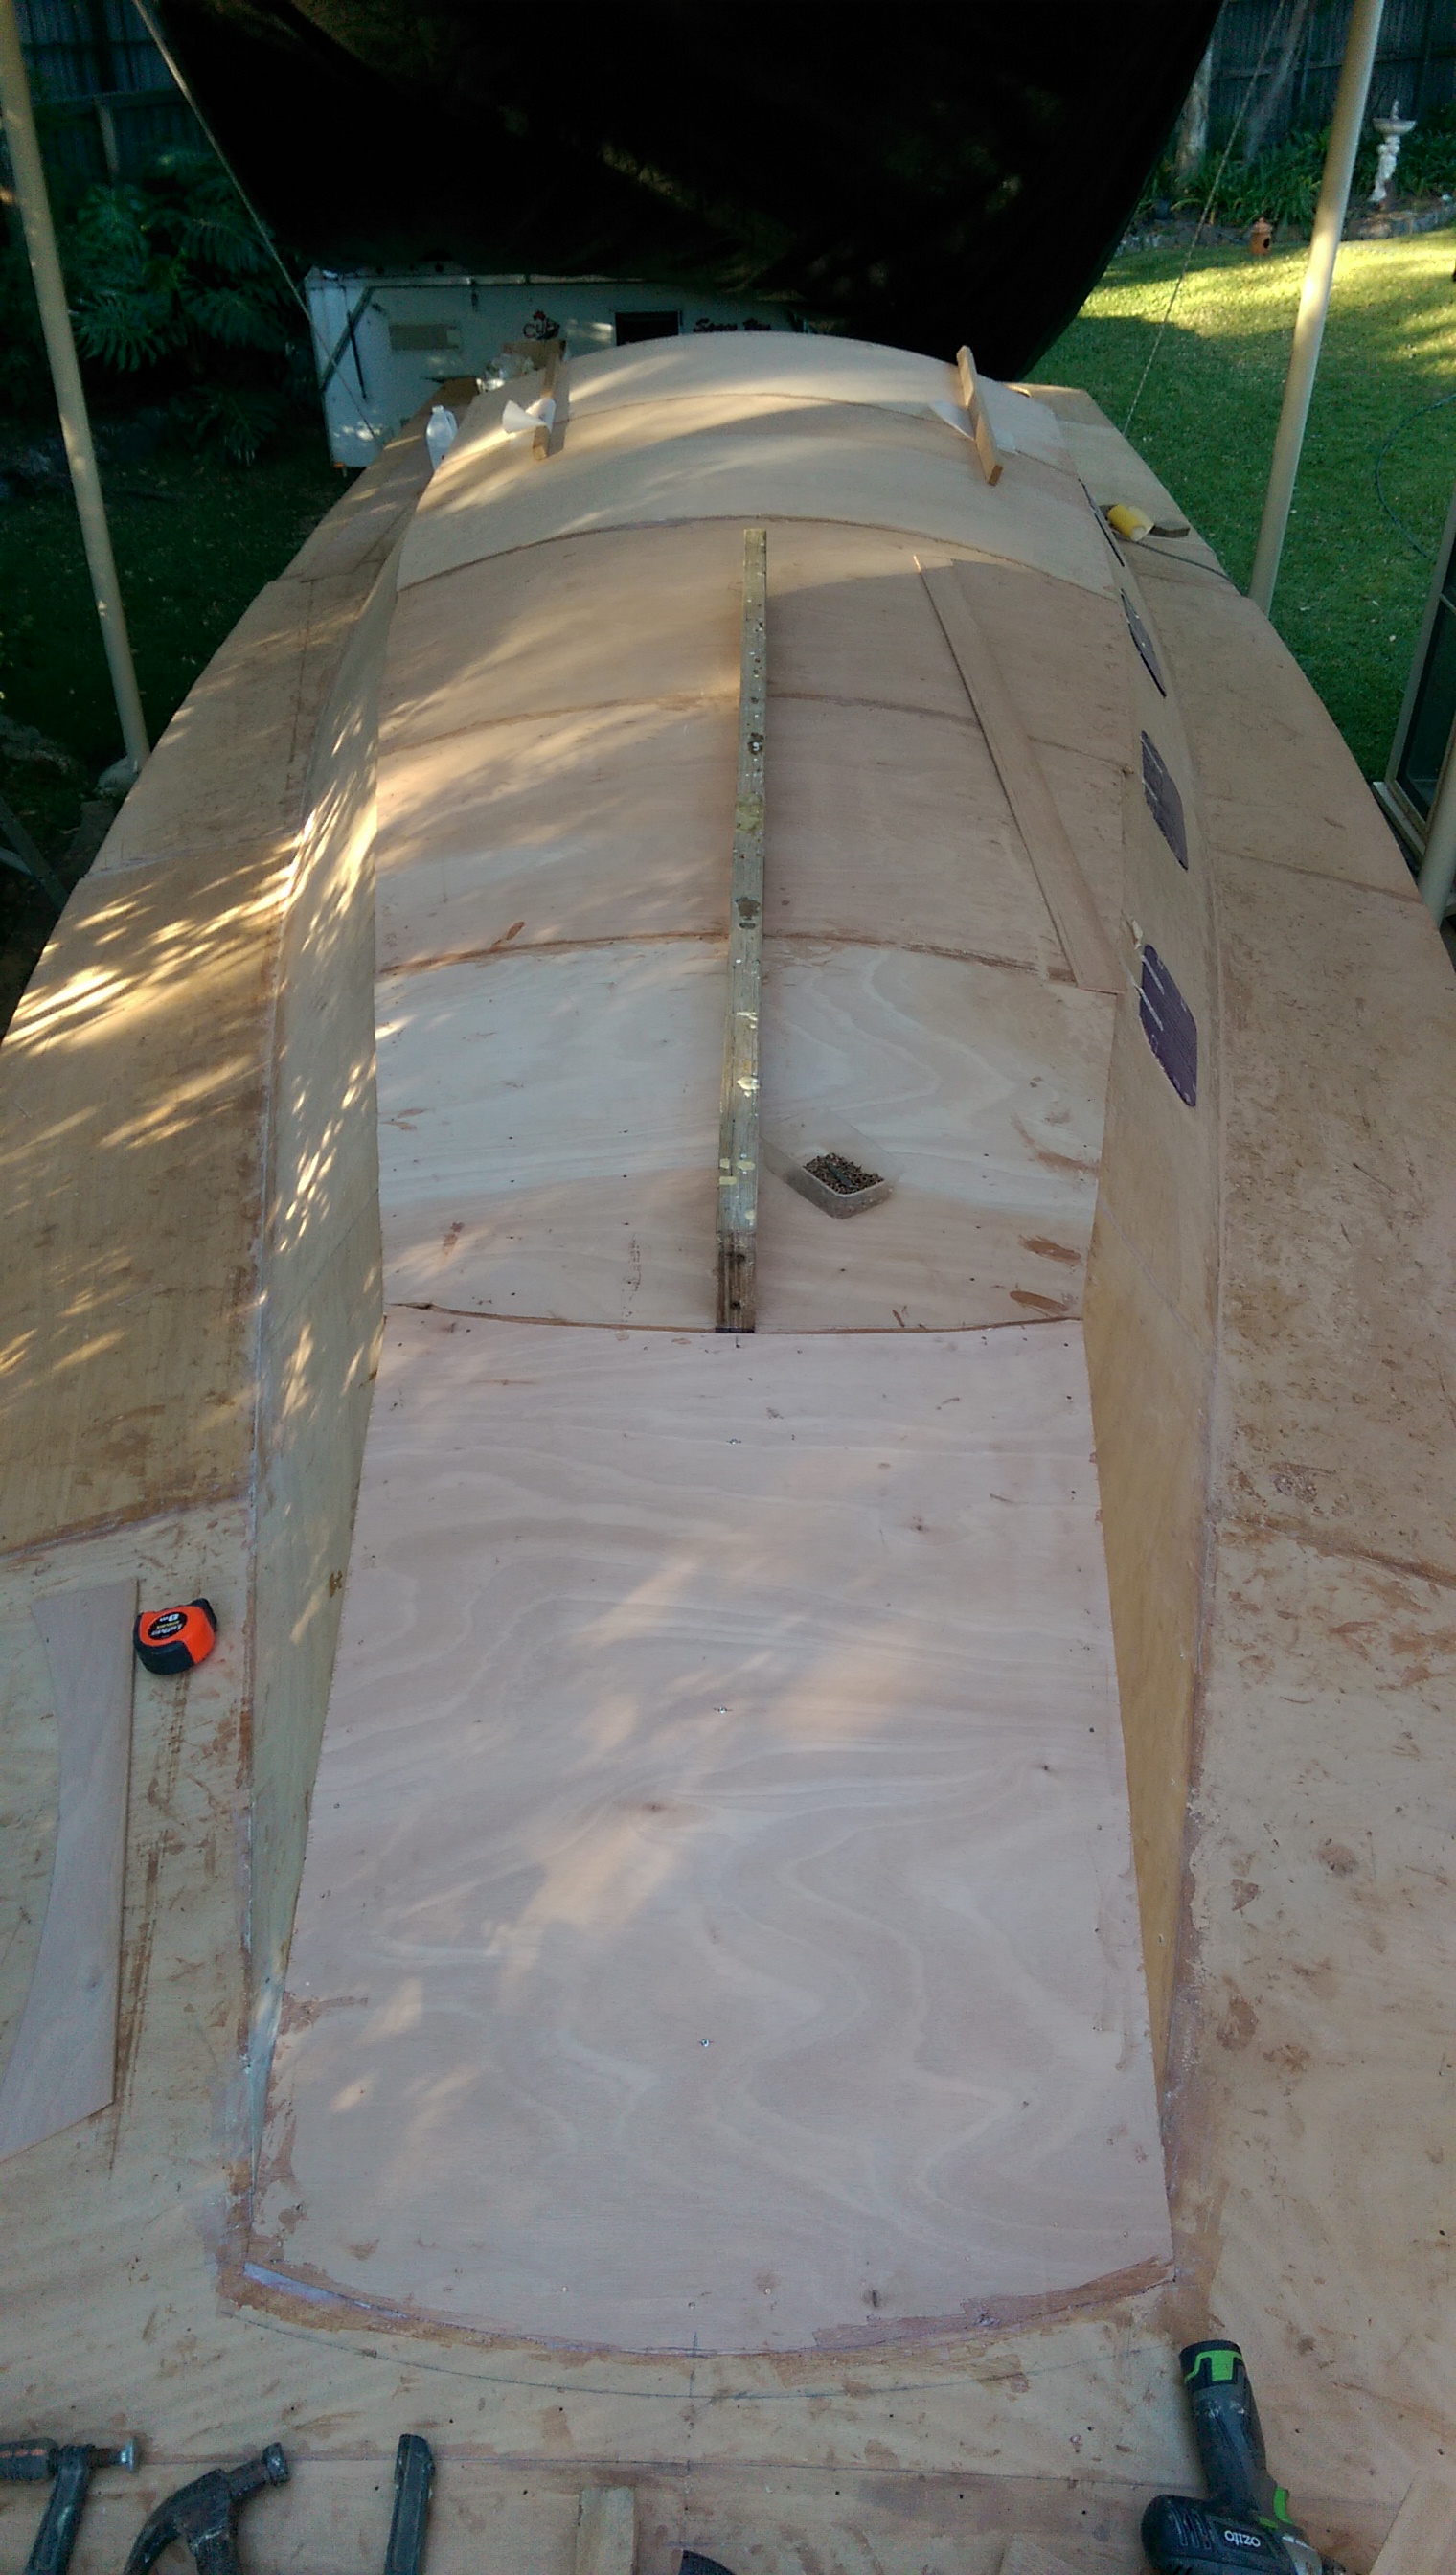
Completed foredeck on our Didi 40 Cr

Once the glue was cured the anchor locker hatch could be cut.

Playing with the engine controls on our Didi 40 Cr
It is pouring rain today so much that I cannot recall the inside of Passion being so wet in ten years of sailing. We did get a race in if a shortened course slow 5 nautical miles constitutes a race. We did get to set the spinnaker and gybe it a couple of times so it is all good practice. The rain soaked spinnaker down below did contribute somewhat to the water inside Passion and now the spinnaker is drying out in our sun room at home.
Before the rain returned I made some progress on Passion X. Since the last post the foredeck is completed and the anchor locker hatch cut from the completed deck. There are four layers of 3 mm ply right at the bow and back further where the curve of the deck is not so great there is 2 layers of 3 mm and a finishing layer of 6 mm ply. Once the deck was completed I was able to complete the 12 mm ply capping pieces from stern to stem. Yesterday was supposed to be wet and it started out that way but when the rain stopped mid morning I started fairing the excess from the capping pieces. There was close to 50 metres of ply edges to be planed flush with the hull and deck and by dark last night i was almost there.
On Friday with help from Kevin we fitted the engine control lever to the hull and measured the length of control cables needed. We also cut out the ply in the location of the engine start buttons and tacko so I can go ahead and make a recess for the panel.
If the weather system moves though I will be able to get back to the deck tomorrow otherwise I will be busy sanding the cabin roof underside.

Most of the capping pieces on the port side of our Didi 40 Cr are fitted. The starboard ones are cut and pre- drilled.

The stem head fitting for the forestay is fitted so now I can complete the deck.

The stem head fitting from the anchor locker side showing the laminated beams front and back of the anchor locker hatch.
A sunny weekend means good boat building weather. While I am reluctant to make too much noise on the weekend I cut out the plywood capping strips that cover the gunwhale and the hull to deck join. I managed to glue on the capping pieces for one side and each join was scarfed for maximum strength. The strips for the starboard side are cut, schafed and pre drilled ready for fitting after I do the final noisy trim of the gunwhale.
A less noisy job was fitting the forestay chainplate prior to installing the deck around the anchor locker. The gunwhales and laminated beams around the anchor locker had to be faired to get the final position of the forestay fitting. used a square to line up the drill bit perpendicular to the stem and eyed the mast post to get the side ways alignment. Once the first hole was true I used the stem fitting to get the hole spacing on the inside and drilled the remaining hole half from the stem and half from the anchor locker. I consider fitting the forestay chainplate a significant milestone so am pleased with the weekend progress.

The final version of the trim on the back end of the king plank. It will get white epoxy in the morning.

With the aid of the phone camera I could see under the sump and check the clearance.

Making good progress trimming the plywood edge of the deck on our Didi 40 Cr

With the cabin top edges trimmed the Didi 40 Cr is looking very finished
As I wound up activities yesterday I discovered the motor sump was sitting on the king plank that joins all the keel floors together. I had not trimmed the back edge as per the drawings. I was annoyed with myself for this so I timed how long it took to lift the motor and trim the timber. With the experience gained yesterday it took just fifteen minutes to lift the motor and 14 minutes to trim the edge of the king plank. Then the raw timber had to be sealed with wet on wet coats of epoxy and painted white with the epoxy primer. There is always a use for left over epoxy and primer so no time or materials were wasted. The only drawback was hitting my head on the support beams many times.
The rest of the day was spent trimming the excess plywood from the deck to hull join. The sound of the Makita blended in with the sound of the wood chippers cleaning up after last weekends storm.
That should have been the end of the story but when I put the engine back on the mounts the sump was still just touching the king plank. Version two was a more aggressive cut and a check of the clearance using the phone camera so now there is clearance.
With the help of crew from Passion we lifted the engine into the boat today. It took longer than turning the hull but we had a very sociable day. I can add a few photos of progress over the last week but it has been mainly trimming and sanding and painting so no big impact photos.
While we worked on Passion X two of the crew did our duty roster at RANSA for the Winter Wednesday race and with the fourth place awarded for doing the duty we are now third overall in the series after six races.

Engine bed on our Didi 40 Cr ready for the motor

The engine supported with chain blocks off the awning being lowered into the hull

We used a plank through the widow openings to support the engine inside the hull. We added a second plank through the next set of windows and a cross beam to get exactly over the engine bed.

The Yanmar YM30 AE-S on the engine bed. I need to lift it off the bed and trim off the aft end of the king plank which is just touching the sump.
Now that the companionway access, the two deck hatches and the nine port light holes are cut there is something to show for my efforts. This morning the temperature inside the hull was down to 5 degrees C so the first task was to turn on the heater. Next in the early morning gloom I used the laser level to check the alignment of the windows. The front one is fixed by the low deck height. The rear ones can be moved around a bit because the cabin sides are taller. I made a small adjustment to make the rear one level with the one in front and set to work cutting out windows. The arrangement is quite conservative but gives a pleasant appearance particularly from the interior. Last thing tonight

Out Didi 40 cr is starting to look like a yacht now that the hatches and widows cut outs have been made.

The windows and hatches in our Didi 40 Cr let in lots of light even in the late afternoon

Another view of the windows from the settee area of our Didi 40 cr
Engine beds ready for paint but there are lots of frames to be glassed to the hull
I used some left over epoxy from reinforcing a keel floor to seal the edges of the plywood.
I have also finished the fibreglass pan under the engine area and completed bonding the engine beds to the plywood hull with 2 mm of epoxy glass so that is ready for some white epoxy primer.
One side of a keel floor has been reinforced with 2 mm of epoxy glass in an exercise that took 2 hours. Based on this time there is a week of work just glassing floors to the hull. Not all my work is on show as I have been using small windows when I cannot make a mess inside the boat to finish other areas. I have started painting the underside of the deck at the transom. It has very low headroom and it requires a bit of skill just to get to the area. As I worked my way out of the space I filled any remaining holes with epoxy bog so that it will be ready for the final clean coat of epoxy paint.
Despite the forecast of wind and rain it turned out a perfect day for gluing up the large plywood panels on the cabin roof.
The second layer of 6 mm plywood was glued in place today and I used up 6.5 kg of epoxy resin. The cabin top does not look any different with the second layer so no photos. I do have the hatches and most of the port lights so I can cut the holes for these in the next week.
I am pleased with the appearance of the cabin roof from inside the hull and the roof above the “v” berth at the front of the boat. It will soon be time to clean these up and start painting. I am keen to paint over all the bare patches where the frames were supported on the building frame and I am still debating with myself how much of the timber to varnish as features and how much to paint the same as the roof.

Cabin roof above the galley in our Didi 40 Cr. I have started sanding the join in the frame in the head and you can see the start of the faring process through the door

The sloping cabin front is where one hatch will go. There is still some deck to lay at the front of the V berth. The bare timber patches are where the hull was supported on the building frame when it was upside down.
The long autumn has been a blessing with respect to boat building conditions and I have been able to put in a couple of ten hour days. Monday was spent installing most of the double layers of plywood under the cabin roof. These are designed to take the load of the winches and cleats and deck organisers. I wanted to glue these into place before finishing the final 6 mm plywood layer on the cabin top for several reasons. The additional two 6 mm layers of plywood fix the cabin top shape and give a solid backing to which the final layer can be screwed down and any of the screw holes from fixing the backing plates will be hidden under the final layer. I have increased the area of cabin top that has the two 6 mm plywood doublers because as well as winches and cleats I need backing for the spray dodger arches and the spray dodger track. Also we will be putting a bridle for the mainsheet controls across the cabin top and that needs a pretty substantial anchoring point. The extra weight is insignificant and I get a smooth inside of the cabin top without any stringers or visible step changes in thickness.
I am thinking of getting the Yamnar 30 hp engine delivered next week. Before putting it in the hull I have to complete an epoxy fibreglass pan inside the engine mount timbers and give it all a few coats of epoxy paint. Also on order are the hatches and portlights and the stainless steel chainplates so there will be plenty to do.

Until I get the second layer of 6 mm plywood glued to the cabin top this is my only access to the interior of the hull
The first 6 mm ply wood layer on the cabin front of our Didi 40 Cr. The Deep LVL beam is a straight edge holding the cabin top level while the glue cures.
The first layer of 6 mm plywood on the cabin top is completed so here is a photo taken after dark. The beam on top of the cabin is a deep section of LVL which is keeping the front edge of the cabin top straight while the glue is curing on extra layers of reinforcement underneath. The extra layers of 6 mm plywood reinforcement are held on place with temporary screws from below up into the smaller strips of timber on the front of the cabin top.
After the photos I added a couple of temporary timber stringers to the cabin top on both sides of the companionway to keep the deck as straight as possible while the glue cures. I will add two layers of 6 mm plywood under the deck on each side of the companionway to take the load of winches. Once the glue on these is cured the last layer of 6 mm ply will be added over all the cabin top and then I will be able to cut out the top over the companionway. Until then it is a bit of a wriggle to get into the hull through the small opening.

First layer of 6 mm plywood on the cabin top of our Didi 40 Cr

View of the first layer of 6 mm plywood from the stern
Sydney has turned on some great days for boat building. Not a lot of breeze and above average temperatures makes working outside very pleasant. I hoped for more progress but the task of fitting the edge clamps to the cabin front was very tricky. As soon as that was done I started on the first 6 mm ply layer on the cabin top and by dark had glued two thirds of the first layer in place. Elaine suggested I needed a post on facebook and a blog to record the progress so here it is.
At the rate I am progressing I will need the hatches and window openings cut very soon so that I have some ventilation down below. I need six large port lights and three smaller ones. There are only two of the larger size in Australia and there is a two month wait for replacements so I will order these tomorrow.

First layer of plywood on the cabin top makes it look very finished.

Cabin beams looking aft to the incomplete roof
I am varying the window layout on our new Didi 40 Cr. It will be a quite conservative arrangement but one that has been used on many production yachts. To check the visual appeal before ordering the windows I made up some mock windows from cardboard and cellophane and stuck them to the cabin sides. It was a useful exercise which resulted in me moving the positions around a little for a better look.
Friday was a big day with Kevin giving me a hand to glue in the cabin sides. There are two scarf joins in each side and these had to be glued in situ. To ensure a clean join we covered the joins with baking paper and screwed backing pieces of 12 mm plywood across the four joins. Today was a big clean up day with lots of sanding of excess glue and trimming of the excess plywood on the sides. Later today there was the final fairing of the cabin top beams and the shaping of the beam clamp at the edge of the cabin top. It is all done and I fitted a panel of 6 mm plywood to the cabin top to check all the contact surfaces. It is looking good to start the first 6 mm plywood layer on the roof on Monday.

Checking window spacing on our Didi 40 Cr

Bow end view of the window spacing trial

Trial fit of the first of six panels that make the cabin sides

Fiddly little laminated corner supports for the post and beam of the cabin top.
A month less one day has passed since any constructive work has been done on our Didi 40 Cr. Immediately after the Port Stephens Regatta three of the crew boarded the plane to Mexico for the Laser Masters World Championships. One of the crew was fourth in the over 75 years category. Elaine thinks they should all get a prize just for being there but the Laser cubes are strictly regulated so that they retain their value. In the 65 to 75 age group I fought it out with fellow crew member for fifth and sixth place. The number of entrants meant only four cubes for our division but fifth and sixth places are no mean feats and we are very satisfied with the results.
Jet lag has kept me subdued for a couple of days and Wednesday was the first of the RANSA Winter Wednesday races. Thursday was spent on administration matters for the GFS presentation afternoon in a couple of weeks so today was the first chance to work on the new build. I did complete the really fiddly task of installing four 50 by 25 posts to support the cabin top beams. There is no easy way to get these straight across the hull and up and down but with plenty of straight edges and clamps the job was done to my satisfaction and dinky little laminated corner reinforcements were added. All the stainless steel screws are hidden so I still have the option of varnishing the laminated roof beams. As evening falls early after daylight saving ends there was just enough time to cut our one 12 mm plywood panel for the cabin side. I scaled a development off the small lines plan and that worked our very well only needing a single trimming against the deck to get a close fit.
In the early morning before it was noise making time I reviewed all the purchases I need to make and later in the day ordered the 30 Hp Yanmar diesel and associated fittings. I have paid a deposit and the engine is on hold until complete the engine bearers. The plan is to take delivery after the bearers are installed permanently and drop the engine straight in.

Cabin beams on our Didi 40 Cr

Cabin beams on our Didi 40 Cr viewed from the foredeck
Just a quick post to show photos of the cabin beams that are now installed on our Didi 40 Cr. All the prefabricated beams and beam clamps have been used so progress will appear a little slower while I complete the framing for the sloping cabin front.
The beam in front of the companionway has an unsupported span of only 600 mm and locks into the fore and aft frames that form the head and quarter berth ante room. I made these of 12 mm plywood so the structure is very solid